Friday, December 12, 2008
Finished Fish Quilt
Coursework has been taking second place this last fortnight because I decided to finish one of the fishy quilts (see earlier entry here) and give it as a christmas present (the recipient doesn't know yet but it's OK, she isn't a blog reader). As always, it took longer than I had allowed but here is the finished article using just the blocks on turquoise backgrounds and just simple quilting. Eventually, I will make up the purple version and that one is MINE - sorry to shout but I keep making lap quilts and giving them away, so I am the only one left with cold knees. And I also have the left over blocks that will turn into cushion covers at some point so the disaster has been recovered. Just a couple more things to finish before Christmas then it is back to what I am supposed to be doing.
Wednesday, December 03, 2008
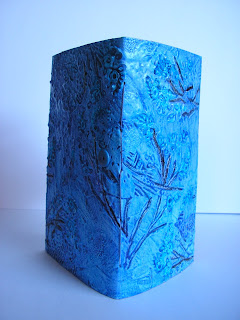
Finished Book Tower
Just remembered I meant to add these pictures as well - the completed vessel/book from Maggie Grey's online class (see earlier post here ).
First attempts at ATCs
Monday, November 24, 2008
Module 3, chapter 2
Continuing the theme of strapwork, I have been researching and drawing examples of Celtic knotwork. The first photo shows sketches on graph paper of knots made using David Nicholl's method as described in Celtic Inspirations for Machine Embroiderers (Valerie Campbell-Harding and Maggie Grey). The knots in the second photo were drawn on grids from How to Draw Celtic Knotwork by Andy Sloss. The one on the right, with the black background, is copied from a page of the seventh century Book of Dimma - I find it interesting that the ends are different with a closed loop at one end rather than a continuous line. In the central drawing, I used the same design but on a curved grid, and the one on the left is an attempt at drawing a tapered knot (it is a bit wobbly!). I have played with drawing simple knots before but never done anything more with it, so I am trying to take it further this time.
Bird Book
This weekend I went on a two day workshop with the Embroiderers' Guild, Bristol, run by Frances Pickering. Frances makes wonderful decorated books using craft vilene, gesso, stitch and paper - see her website here for examples. This is the one I made, not quite finished. I still need to add a fastening and tidy up the edges of the cover, and then think about the contents. At the moment, the pages are just washed with Brusho but the idea is to fill them with drawings, words, colour, stitch on the chosen theme. I decided on birds because I had a lovely woodblock, bought on holiday a few years ago, which I used to impress in the gesso and then stitched in places. The book cover wraps over itself, this next picture shows the back.
Sunday, November 09, 2008
Joining In
I have been having fun this week joining in with the online tutorials by Maggie Grey. To take part, you need to have her latest book Textile Translations and visit the publishers website. Lesson 1 is making a vessel/book - here are some pics of my work in progress. I have also been keeping my sewing machine busy making quick and fun christmas presents, but I can't show these just in case the recipients are reading.
Cogitating
A few pages from my sketchbook playing with the printed cog designs and adding some extra lines - not sure where this is leading but they seem to be heading towards some sort of hanging. Haven't done much this past fortnight partly because of half-term and also because I have let myself get distracted with other things (as usual) - will be posting about that on my other blog soon.
**Ed.s note - something very odd happened to my photos after I published this post, they went all pixelated - I have re-added them. With luck they should look clearer now.**
Labels:
assessment piece,
cogs,
machinery,
Module 3
Sunday, October 19, 2008
Just after I finished posting this morning, I was catching up on some blog reading while Sunday lunch was cooking and saw this post on A Wrinkle in the Calico about a site that lets you create giant posters. So, after lunch and after letting the children have their time on the computer- grrrrrr- I just had to have a play with the black and white cogs design (last photo on this morning's post). I am not going to print out all of it, but looking at it on screen has given me some ideas - maybe enlarge the design, split into columns then shift them out of line. Of course, I could print out all the parts and try rearranging them like a jigsaw. Or maybe print sections onto inkjet fabric and join by continuing the shapes over the spaces inbetween with machining. As usual, it will probably turn out as something completely different. Need to spend time with the sketchbook - watch this space.
Labels:
assessment piece,
cogs,
machinery,
Module 3
Designing With Cogs
Following on from thinking about clocks, I pulled out this photo from my module 1 sketchbook. I took this on holiday in Venice a few years ago, in one of the churches. It is actually part of an old mechanism for the church bells - I am sure there is a proper name for this but I don't know it - rather than a clock but it has the lines and cogs I was thinking of. I had a little play with paper cutouts which I scanned in and manipulated in Paint Shop Pro. Here are the bits of paper on a black background.
Then I cut out some more and added some texture with gesso, gold spray paint, crackle medium and black paint on top - the picture doesn't show the gold cracks very well.
I combined this scan with a background that originated in my earlier work with pylon patterns - rubbings from folded paper scanned in and given a new colour scheme. I filled a layer with a metallic gold colour and masked it with the cog shapes so they take that colour and are slightly transparent. The second picture is the result of playing with preset displacement maps. I like the way the shapes extend out of the background in this one.
Finally (for the moment), a black and white study to look at layering the shapes. This is just the scan copied and pasted on top of itself, offset and cropped, with the layers given different amount of transparency. To make the shapes clearer and give more depth, I added drop shadows.
Labels:
assessment piece,
cogs,
machinery,
Module 3
Sunday, October 05, 2008
Adding Sound to Animation and Some Tricky Stitches
Over the last few weeks, I have changed my ISP, set up a wireless network and bought a new computer (now the children have the old one and we can stop arguing over who gets to go on the internet and for how long). It is far worse than moving house - hours going through address lists wondering who these odd names belong to and if I want to give them my new email and more hours checking all my online ids. Finally I have moved over all my favourite bits of software, found out if they still work, and sorted out the licences so they work on the new machine. Now it is all done, I have been playing with Vista and especially the Movie Maker and DVD Maker - at last a big enough memory to cope with everything at once. So, I have added some sound effects to the animation (yes, I know I said it was finished but can't stop fiddling). Here is a clip from it to get the idea - you need to imagine it projected onto the background I made.Have a look at the Coursework pages of my website to see my earlier notes and pictures. The sound is intentionally quite low so you may need to turn up the volume. It is part of my plan that if you were in the room, you might not be sure if you heard it first time.
In complete contrast, I have been continuing with the stitch sample for the Tudor historical study - having a hard time with the plaited braid stitch so I have just kept doing it. There is some very dodgy tension as you can see in this photo but I refuse to be defeated.
The sample shows basket stitch, braid stitch, plaited braid stitch, ladder stitch, detached buttonhole, knotted detached buttonhole.
Sunday, September 28, 2008
The Corpus Clock
Carrying on the theme of machinery - I heard about the Corpus Clock today on the radio and just found the video on YouTube showing it in action, narrated by the designer - click here to see it. I think this is the most beautiful piece of engineering and I like the way it is slightly frightening; it makes you very aware of the passing of the seconds that will never return, Death's bony hand on your shoulder like those mediaeval woodcuts. I will have to try and see it in real life one day.
Hmm - Could this be the inspiration I need?
Wednesday, September 24, 2008
Starting Module 3
Chapter one of module 3 is all about Tudor embroidery - I am collecting notes and images about strapwork at the moment and trying out the stitches. Here are my first attempts with a nice thick thread and the help of my trusty Mary Thomas book of stitches and a mirror (don't you just love being left-handed).
Still thinking vague thoughts about the metallic effects piece. I would like to tie in with my industrial theme and wondered about Tudor technology - some connection with printing presses maybe? I came across the expression 'steampunk' recently for the first time - it refers to the aesthetic of making modern technology look as if it comes from another era, eg a laptop with lots of brass and leather that could have been designed for a Victorian gentleman. One of those trends you have seen without realising it had a name. I think it came from fantasy novels in which technology appears before its time. When I did a search, the first article I found was a piece saying how 'over' and unfashionable it is now, but who cares - it may still work for me as a starting point.
Art Competition and a Soggy Catalogue
Saw this in the Sunday papers so I thought I would share it - a competition sponsored by Ford to advertise their new Fiesta cars. They are looking for an artwork to represent the essence of "now". According to the blurb, they will welcome different media - wouldn't it be great if a textile piece won? Click here for details.
I wandered outside yesterday to see how the catalogue I planted under the grapevines is doing as there hasn't been much rain since it went out. It hasn't grown me a new laptop tree yet but is getting nicely damp underneath as you can see (If you are reading this thinking I have lost it completely, take a look at this post in Maggie Grey's blog. and all will be explained).
Sunday, September 21, 2008
Knitting and Stitching Show, NEC Birmingham
Last Saturday was my annual treat - a trip to the Knitting and Stitching Show. My favourite because it combines excellent exhibitions with shopping. I have been going to Alexandra Palace for years but this was my first try of the NEC show. At first I thought I had come on the wrong day - getting off the train at Birmingham International, it was a 10 minute walk through endless corridors and escalators to reach the room, and in that time I only saw one other person (also looking for the K&S). To be honest, seeing that huge place deserted in the middle of the day was a bit spooky; presumably there were no other halls in use. If I had found that out beforehand, I would have taken the car and saved myself a couple of hours travelling time (and about half the train fare). Still, it was well worth it once I found the hall. No photos to share, I'm afraid, as there were 'no photography' signs all over the place but I have added to my postcard collection.
I always enjoy going around the graduates showcases - my absolute favourite this year was "The System's Erupting" by Felicity Clarke. She has used cables and wires and plugs inside knitted tubes or wrapped with vivid yarns to create an installation in which all the electrical 'gubbins' are literally bursting out of the wall and rising up in a giant tangle.
Another personal choice was "Memories Are Made of This" by Carol Quarini, part of the Divergence Exhibition by the Westhope Group. This is 3 long narrow panels suspended from perspex rods which represent the degeneration of memory. The first is a complete length of large scale lace, the shapes representing nerve cells in the brain. The second is begining to break with clouds of silk paper replacing the shapes. Finally, there is just the cloudy background with a few last threads of memory. I found this a very poignant visualisaton of gradual memory loss.
Now, I always like a bit of audience participation, so I had to join in with Alfreda Mc Hale's interactive installation "Seeking Pearls". She has collected thousands of old and unloved buttons, spools of thread and skeins from old collections, and preserved them by bottling them into jam jars, preserving jars and even the tiny glass jars that herbs are sold in. There are dozens of these stacked on shelves like an old-fashioned sweetshop, and visitors are invited to take one, empty the contents into a large bowl of buttons and refill it with their selection from the bowl. You could then mark it with a sticky star, so no-one else will touch it, and replace it on the shelf. So the collection is gradually rearranged and the buttons have been appreciated and chosen once more. It brought back old memories of spending wet Sundays tipping out my mother's big bag of beads and sorting through them, loving the colours and the feel of them and the different shapes and sizes.
Finally, it was good to see one of my favourite charities at the show. The Sailors Society exists to combat the isolation of seafarers and give practical support through a network of centres and chaplains. They regularly distribute woolly hats knitted by volunteers (about 20,000 each year) and were holding a wonderful display of entries to their recent competition to make an outrageous hat that no self-respecting sailor would want to wear. I like to occasionally knit hats for them to keep my hands busy while my daughter is in gym class (or swimming, or dancing or whatever) so I handed one in while I was there.
Sunday, September 14, 2008
Meggiecat's Purse
A little while ago, there was a post on Meggiecat about making a little fabric purse from a template she had designed for a paper purse. Click here to see the original purse and download the template. I thought I would have a go to see how it would turn out in fabric, and while I was at it I wrote down the instructions - so here we go.
You will need two fabrics - a main one for the outside and a lining. I used some scraps of patchwork cotton for this trial. You will also need a piece of pelmet/craft vilene and some Bondaweb.
Print two copies of the purse template and one of the handle/tab. I increased the size to 140% to make it easier to handle - it still fits onto an A4 sheet.
Cut out one copy of the purse omitting the gusset. Draw around this onto the paper backing of some Bondaweb. Iron onto pelmet/craft vilene and cut out, leaving the paper in place.
Cut out the second copy of the purse template - the whole thing this time. Draw around it onto Bondaweb as before and iron onto the wrong side of your main fabric. Cut out leaving the paper in place.
Pin the second (complete) copy of the purse template to your lining fabric and cut out.
Remove the paper backing from the vilene and lay it, Bondaweb side down, onto the wrong side of the lining. Iron to fix.
Vilene on top of lining fabric, ready for ironing.
Remove the paper backing from your main fabric and lay it on top of the vilene/lining, wrong sides together. Iron to fix. You now have a single piece consisting of the main fabric and lining, right sides out, with the vilene sandwiched inbetween. The Bondaweb will help prevent fraying but the raw edges need to be neatened, this could be done by hand or machine. I used a machine satin stitch, width 4.0 and length 0.4, with a satin stitch foot.
You will need two fabrics - a main one for the outside and a lining. I used some scraps of patchwork cotton for this trial. You will also need a piece of pelmet/craft vilene and some Bondaweb.
Print two copies of the purse template and one of the handle/tab. I increased the size to 140% to make it easier to handle - it still fits onto an A4 sheet.
Cut out one copy of the purse omitting the gusset. Draw around this onto the paper backing of some Bondaweb. Iron onto pelmet/craft vilene and cut out, leaving the paper in place.
Cut out the second copy of the purse template - the whole thing this time. Draw around it onto Bondaweb as before and iron onto the wrong side of your main fabric. Cut out leaving the paper in place.
Pin the second (complete) copy of the purse template to your lining fabric and cut out.
Vilene on top of lining fabric, ready for ironing.
Remove the paper backing from your main fabric and lay it on top of the vilene/lining, wrong sides together. Iron to fix. You now have a single piece consisting of the main fabric and lining, right sides out, with the vilene sandwiched inbetween. The Bondaweb will help prevent fraying but the raw edges need to be neatened, this could be done by hand or machine. I used a machine satin stitch, width 4.0 and length 0.4, with a satin stitch foot.
Cut out the template for the tab. Draw two copies of the tab onto Bondaweb as before. Iron onto the wrong side of main fabric and cut out. Remove the paper backing and place the pieces wrong sides together. Iron to fix. Neaten the edges - I reduced the stitch width to 2.5.
Now the handles - I found the curved shapes very fiddly in fabric, so I cut a template 20cms long by 1cm wide with pointed ends. Make two handles using the same method as for the tab. Attach the handles to the purse using a bead to cover the stitches.
I like the folded gusset in the original so I kept them in this version. To make the folds, lay the purse on a table, lining side up, and place the template on top. Mark the ends of the fold lines around the edge of the gusset with dots - you do not need to draw the whole line.
Fold the purse sides up, creasing the vilene to make a flat base. Now pleat the sides using the dots to show you where to place the folds. The Bondaweb gives body to the fabric allowing it to stay upright. Press each fold with the edge of an iron as you go. Refer to the photo below to see the result, it is slightly different from the paper model.
Use paper clips to hold the pleats in place and let them settle. To finish, add the tab using beads again over the stitches. Finger crease the edges of the base to make the purse stand upright.
Finished purse with a cotton reel for scale.
I think the handles look a little thin and floppy - you could make them wider and stiffen with interfacing. As this was a trial piece, I did not decorate the fabric. To make another one I would add lots of stitching or applique on the main fabric piece before bonding it to the vilene and lining, or perhaps print/dye/paint the fabric before cutting out.
Sunday, September 07, 2008
Young Embroiderers
My two girls are members of Young Embroiderers - part of the Embroiderers' Guild - and over the holidays the youngest (9) made this piece as her entry to the annual national competition, which was on the theme of "carnival - colour and movement". She designed and made it by herself (with me acting as chief needle-threader and fabric supplier). It doesn't show very well on the photo, but she used the lettering on my sewing machine to write on the banner - it represents a dance school float. It was the first time she had used my machine so we are both very proud of her. I sent it off this week and promised I would show a picture of it to all my friends, so here it is.
Sunday, August 31, 2008
New Website
Well, I still don't know what happened to my website but as I had been thinking of making changes anyway this seemed like a good time to do it. I now have a new site at http://www.janeoleary.name and have spent rather too much time today revamping the pages. It all looked perfect on the preview but somehow the layout has slipped around now it is online. More adjustments needed!
Saturday, August 30, 2008
Fish Patchwork Part 2
This week I have been spending odd bits of time musing over what to do with this piece. The original idea was 48 6 inch blocks, starting with a pink "fish" on a purple background which gradually changed through 4 fabrics. Then the background would change to turquoise and the cycle continue. Halfway down the quilt (ie after 24 blocks) the order would reverse and the final "fish" would eventually be the same as the first one. As there were to be two of each of the blocks, I started making them in pairs so I now have all the purple backgrounds done and a few of the turquoise ones plus 4 transition blocks. The picture below shows them laid out in order - there should be a bigger gap in the middle but the table isn't big enough.
.
Seeing them like this, I really wasn't happy - it all looked much better on paper! Two problems - firstly the change of background is too abrupt and secondly I don't like the way the fishes look when they are touching on all sides. I spent AGES rearranging, turning the blocks in different directions, trying a chequered effect, but still no good. Finally, I decided to have a rethink and add borders to make attic window blocks. I bought 30cm of two dark fabrics and as everyone was out today, spent some time adding them. The picture shows 2 rows completed.
.
There was a slight hiccup when I realised I have never done a block with mitred corners (memo to self - reading about something is not the same as doing it). My patchwork to date has been just squares and half square triangles but going nice and slow it seems to be working. Of course, adding the borders almost doubles the size so it will be two separate quilts and the transition blocks will be a cushion cover.
.
Seeing them like this, I really wasn't happy - it all looked much better on paper! Two problems - firstly the change of background is too abrupt and secondly I don't like the way the fishes look when they are touching on all sides. I spent AGES rearranging, turning the blocks in different directions, trying a chequered effect, but still no good. Finally, I decided to have a rethink and add borders to make attic window blocks. I bought 30cm of two dark fabrics and as everyone was out today, spent some time adding them. The picture shows 2 rows completed.
.
There was a slight hiccup when I realised I have never done a block with mitred corners (memo to self - reading about something is not the same as doing it). My patchwork to date has been just squares and half square triangles but going nice and slow it seems to be working. Of course, adding the borders almost doubles the size so it will be two separate quilts and the transition blocks will be a cushion cover.
Friday, August 22, 2008
Felted Friends
When I was meant to buying birthday presents last week, I picked up a book called Felted Friends by Sue Pearl (Search Press) and was captivated immediately by the cute animals (I am a big softy on the quiet). Over a couple of days, I sat down with my girls and we made these little fellows using wool tops felted over pipe cleaner skeletons. Details were added by needlefelting - I did this bit for them and have the puncture marks to prove it.
Here they are frolicking in the tomato plants.
From left to right blue bird by Ellie (9), snake by Katy (11) and pink/purple bird by me (over 21). The children are entering theirs in the village flower show tomorrow so fingers crossed for them. No craft section for grown-ups so I am consoling myself by entering some holiday photos.
I have also been busy booking my tickets to visit the Knitting and Stitching Show in Birmingham - I am going up by train on the Saturday. Making the booking involved lots of swearing; I could only get the cheaper tickets if I was prepared to leave Bristol at 7.15 am and take a little diversion to change trains in South Wales - not the most obvious route to the midlands - and come back very late, so I bit the bullet and got the standard price so I can leave at a more reasonable time. At least I can be sure the visit will be worth it and I would really rather not drive to the NEC.
Wednesday, August 20, 2008
Website Problem
I have just found out that my website has mysteriously disappeared - apologies to anyone trying to access it, I am trying to find out what has happened.
Saturday, August 16, 2008
A New Blog is Born
I have found a few times recently that I have arty/crafty things I would like to blog about that don't really fit here (although a few have slipped in) - I want to keep this blog for work and ideas related to my coursework - so I am pleased to announce the birth of Quodlibet.
I shall not be getting module three until September so there may be a few weeks before my next entry here. In the back of my mind I know I should be contemplating the next assessment piece, which logically ought to be the one using metallics, but I need some quiet time to think when I am on my own (it's my artistic temperament you know :-)). In the meantime, come and see me at the new blog.
Fishy Thoughts
School holidays is the time to fiddle with bits and pieces in the odd quiet moment, and I have been playing with some patchwork. I have made lap quilts for the rest of the family over the last couple of years so this is meant to be one for me. The idea was to use the same block which looks a bit like a fish and cycle through the colours. Now I have completed enough for 1/2 a quilt, I am not so sure it is a good idea. I think I shall perservere and if all else fails I will end up with a dozen cushions.
Sunday, July 27, 2008
Playing With Wordle
I came across this website via In a Minute Ago. It is a fascinating on-line resource for creating word clouds from your own text. The size of the word reflects its frequency in the text and there are options for changing font, colours and layouts. I have had a little play with a long blog post from February and saved it in their gallery here. I could have a lot of fun with this. I see T-shirts, sketchbook covers using text from the notes inside and all sorts of things.
Thursday, July 17, 2008
Some Finished Pieces
Most unusual for me but I have finished some pieces! With school holidays fast approaching I know there won't be much quiet time for creating wonderful things for a few weeks, so I have ignored the housework and got these done. They have gone through a few changes since the last pictures, with stitching added and bits torn off, and I have mounted them on canvas boards. Depending on how the hols go, I might persuade the children to join me in carrying out Cas's suggestion of pasting down all the left over bits and pieces in one giant random collage and then looking for interesting bits to work on. I'll let you know if it works.
Wednesday, July 16, 2008
Summer School (3)
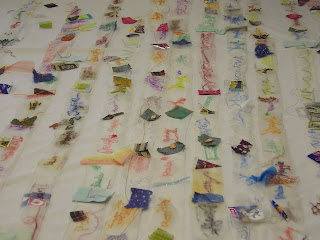
Last batch of photos - these are the friendship ribbons we made on the last day. Each person took a length of sheer fabric and stitched our name on it. We went around the room taking rubbings of everyone else's names and gave each one a fragment from our scraps to attach next to our name on their ribbon. As we went to lunch for together for the last time, we hung all the ribbons over a banister and then each took our own home. Mine is now happily hanging from a beam in the store room so I see it every time I go to ferret around in the boxes.
Tuesday, July 15, 2008
Summer School 2008 (2)
Subscribe to:
Posts (Atom)