Wednesday, November 21, 2007
Trying Another Background
After seeing all my bits and pieces for the assessment piece, Sian gave me some more ideas for backgrounds, one of which was to try plain white panels set at angles. I like this idea - it can look interesting by itself while not being too busy when the projection is going. Here are some photos of my trials using artist's stretched box canvases - the mysterious dark shape at the right is a metre rule to show the scale. I haven't worried too much about placing the canvases other than trying to echo the lines/shapes that will appear - the arrangement would need to fit the space where it is being shown and the size of the projection may vary. I was hoping to get some strong shadows as well but may have to wait until the summer - it is cloudy and wet this week and we have had virtually no daylight in the house. The three pictures below show stages of the animation - the odd colour is because the canvases are bright white but the wall is slightly peachy. My husband has been very understanding about the blu-tac marks on the wall but I think he would draw the line at repainting it white just for a photo.
Picture quality isn't brilliant - it is a case of juggling focus on the projector and the camera and not getting in front of the light. It is quite interesting to see the slide projection close-up on the canvases as the greys split into different coloured pixels. One rainy Sunday, I should try copying the design in paints onto a spare canvas.
Tuesday, November 13, 2007
Animation Frames
In case it is not working, here are some stills from animation 1 on my website to get a flavour of it. The animation cycles through overlays of these images on a loop, so the second one gradually appears on top of the first and the first fades out. Then the third appears on top and the second fades out and so on ad infinitum. It is not as interesting as the black and white one but quite soothing.
Module 2 Chapter 3
Samples for contemporary laidwork - incorporating a shape. Three trials to interpret the design. Clockwise from top left - design on paper; machine stitching and strips of fabric over fabric shape; machine stitched shape overlaid with grid; threads wrapped over a frame held with hand stitches, shape created by stitching another grid on top. The second picture is a close up of this. The colour scheme refers back to work from module 1.
Monday, November 05, 2007
Sample for Background
A quick addition to the last post - a scaled down sample for a fabric background (20cm square). Top a scan of the sample, below it is overlaid with one of the frames from the animation printed onto a transparency.
Some further thoughts on using this piece in different ways 1) get individual frames professionally printed onto box canvases and hang as a series. 2) use individual frames as a basis for further digital development eg as a tube in Paint Shop Pro 3) play with simplified version with software for embroidery machine to produce repeatable motif.
Assessment Piece
Work continues on this piece (see September entries). I have finished the animation finally and need to sort out a background. Unlike the earlier drafts, I haven't published the animation on my website because the file is so large.
To clarify my ideas for the background, I have tried blu-tacking various things to the wall and projecting images onto them to get an idea of the effect. I have done this simply by printing small images onto OHP transparencies and using a slide projector so they are very grainy - the real thing would be better quality (I hope). In the photo below, the wooden stick on the left is a metre rule to give a sense of scale.
The first picture shows various pieces of fabric keeping the blue theme from earlier work - all but one are from my dyed samples so I could repeat roughly the same colours. If I used a fabric background, I would wrap toning threads around in straight lines to echo the paper samples. To see what I mean, see Animation 1 at my website.
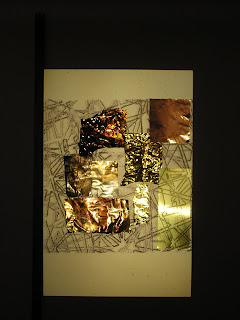
An alternative idea is to use a metallic background so I tried sticking up a few different metal samples - eg puree tubes, shim, drinks cans coloured by heating (these are all bits I already had stashed away). From the picture below left you can see there is a problem with reflections and with some parts being too dark to show the image. The piece of metal at the bottom right of this picture with the clearest image is brass shim which has not been used and is smooth, but as it would be rather boring by itself at full size, I heated it over a picnic stove to add some colour - see picture below right.
.
To clarify my ideas for the background, I have tried blu-tacking various things to the wall and projecting images onto them to get an idea of the effect. I have done this simply by printing small images onto OHP transparencies and using a slide projector so they are very grainy - the real thing would be better quality (I hope). In the photo below, the wooden stick on the left is a metre rule to give a sense of scale.
The first picture shows various pieces of fabric keeping the blue theme from earlier work - all but one are from my dyed samples so I could repeat roughly the same colours. If I used a fabric background, I would wrap toning threads around in straight lines to echo the paper samples. To see what I mean, see Animation 1 at my website.
An alternative idea is to use a metallic background so I tried sticking up a few different metal samples - eg puree tubes, shim, drinks cans coloured by heating (these are all bits I already had stashed away). From the picture below left you can see there is a problem with reflections and with some parts being too dark to show the image. The piece of metal at the bottom right of this picture with the clearest image is brass shim which has not been used and is smooth, but as it would be rather boring by itself at full size, I heated it over a picnic stove to add some colour - see picture below right.
There are of course other options - I like the idea of using something old and rusty but so far haven't found anything suitable. It needs to be a bit over 1m square and portable enough to wall mount for exhibiting (or maybe lean against a wall). It would also need to be fairly light coloured to show the black lines clearly - all suggestions gratefully received!
Perhaps I could create a project by taking a projector out and about to different locations and filming the results - for example by running the animation against some storage containers or warehouse walls or a gasometer. Now all I need is a fairy godmother with a data projector (is there such a thing as a battery model?) and a camcorder.
.
Friday, November 02, 2007
Four little samples loosely based on laidwork. Clockwise from top left 1) scraps of fabric held in place by a grid of long stitches and cross stitches 2) torn fabric strips laid on soluble fabric, threads couched down with lines of machine stitching. Dissolved and applied to background with rows of running stitch 3) dyed pelmet vilene, wireform held down with long stitches, couched stuffed cotton ribbon, on top a grid of long stitches held down with small stitches at the intersections 4) close lines of long stitches, lines of tailor tacking held in place with cross stitch.
Module 2 Chapter 2 Continues
This is the second batch of designs based on laidwork. All of these were made using artist's masking fluid and I wanted to do these to have a more consistent colour scheme from which to work samples. Unfortunately, in some places the masking fluid stuck fast and wouldn't shift without tearing the paper even though I used the same paper as before.
Monday, October 15, 2007
Module 2 Chapter 2
.
These are some little designs based on the idea of laidwork as used in the Bayeux Tapestry. Obviously this is a very free interpretation using layers of grids and adding shapes drawn from my pylon studies.
.
The designs have been made using layers of Brusho inks with artists' masking fluid, masking tape and candle wax as resists and are each about 10cm square.
.
You can see the different effects of the resists in these three orange samples which each use more than one. Masking tape leaves clearly defined straight lines while masking fluid gives a fairly sharp resist that can be painted into shapes (here curved lines). Rubbing a candle is a less efficient at resisting the ink but gives an interesting broken colour look at the large stripes top left).
Wednesday, September 26, 2007
Starting Module 2
Sometimes I don't know where the time goes; September seems to slipped by unnoticed. I didn't make it to the Knitting and Stitching Show at the NEC as I was taking part in Sing For Water in London, but the good news is I have booked my train ticket for Ally Pally in October.
Work continues on the animation as I am still tidying it. I have tried creating in different formats so I can try different ways of projecting, for example using Powerpoint. It is a bit academic at the moment as I don't have access to a data projector but I have used a stills as slides to get an idea of scale. I think this will be my large-scale piece as it doesn't fit any other category so I need now to plan the background for the projection.
I have also started on module 2, reading up about the Bayeux Tapestry and drawing some of the wonderful trees and animals from it.
Monday, September 10, 2007
Work in Progress
Now the children are back at school, I have been able to think seriously about the first assessment piece. I am experimenting with the idea of using the animation I created some months ago, replacing the digital image with stitching. I have started working stitched samples which I will scan into the computer.
My first idea was to use free machining with cable stitch to reproduce the uneven lines. I soon realised that the detail would become fiddly and that the thick thread looked too untidy. As I have an A4 scanner, I am restricted to this size for samples. When scanned, there were a lot of uneven shadows. The photos at the end of this post show the back and front of this sample (sorry, I am having trouble getting photos in the place I want them).
My second sample is handstitching on white cotton (photo at top of post). At first I used running stitch but then changed to long straight stitches. I used shades of black and grey to add variety to the lines and left it in the hoop for scanning. It will be interesting to see if the scanned image has shadows from where threads have been carried across the back and how effective this is - or will it just look messy.
As I am planning to lose the background before animating, I am making a further sample on white card, again with long stitches and shades of black and grey. The photo of the partially stitched sample shows shadows on the card which would be good to keep. I shall have to see whether a photograph or a direct scan looks better.
Metal Samples
I have put together some of the loose pieces made at summer school to make a book of samples using metal effects. The one above is a piece of tomato puree tube embossed and coloured with alcohol inks. I have put it on a background of painted puff paint and covered with silk paper and wire stitching, It hasn't photographed very well - even without a flash I was getting a lot of glare.
Below is a strip of crimped shim on top of fabrics coloured with transfer crayons and transfoil.
The cover for the book is small pieces of stitched metal underneath water soluble paper, stitched and partially dissolved, coloured with walnut ink and applied to a background of crumpled tissue on pelmet vilene. A little colour added with Moon glow sprays and joined with wrapped pipecleaners ( this is Maggie's influence!).
Monday, August 27, 2007
Visit to Slimbridge
Today we took a family Bank Holiday outing to Slimbridge and I finally had a chance to see the South West Textile Group's 'Flight' Exhibition - for some reason I thought it had already closed so this was a pleasant surprise but meant I was not armed with a notebook and pencil. I fell in love with the swarm of insects hanging from the ceiling and a piece called Landing Gear which played on the idea of aeroplane wheels and birds' feet.
During the week, I have been sorting out the samples from Summer School and making a book for the smaller ones. Hope to have photos here soon.
Monday, July 23, 2007
When in doubt, use the scissors.
I committed myself back in May to entering two pieces plus some cards into the Embroiderers' Guild SW region exhibition "Waterways" in Gloucester, confident I would have them finished well before the children broke up from school so I could do some more coursework. I hasn't quite worked out as I expected. First, I lost the little bag that I had managed to finish (and found it several days later in the place I had first looked), then I decided I didn't like the second piece once it was finished. What to do? Fortune favours the brave so I grabbed the scissors, cut it into three pieces and remounted onto 3 small square artists' canvases. Much improved. All the bits are now safely packed up and ready to be delivered.
School broke up on Friday so I don't expect to get much done in the next 6 weeks.
Friday, July 06, 2007
A Lucky Find
At summer school, I was puzzling over how to display the transparent 'slides' I had made of layers of pylon prints. They are about 20cm square and need to stand in something that allows you to look through them and also rearrange the order. Sara came up with the idea of making them smaller and using a CD rack - one of the wire ones that is a bit like a toast rack, but the only ones I have spotted so far are designed to stand upright and don't balance if they are lying flat. My other idea was something on the lines of the cardboard toy theatre we had as children where you slotted in the scenery.
While I was doing the supermarket shop this morning I wandered into the stationery section and suddenly realised I was looking at rows of open-fronted cardboard display boxes with slotted sides. And they come in lots of different shapes and sizes. After inspecting them all closely, I found one that is just the right size for the slides and luckily it only had one item left in it (which I left neatly on the shelf). With a bit of paint and some trimming, I am hoping it will be just the job.
Thursday, July 05, 2007
Summer School 2007
I really am going to try and get in the habit of updating this blog weekly (even if it is to confess no work done) so here goes. Came back yesterday from the Distant Stitch summer school at Urchfont Manor - what a wonderful experience. Once again working from dawn to dusk apart from regular breaks for huge amounts of food and fresh air when the rain stopped. This year we worked with metal with Maggie Grey and Kantha with Sian.
Maggie (centre) with Kaye and Avis.
Margaret hard at work.
Maggie (centre) with Kaye and Avis.
Margaret hard at work.
Wednesday, June 27, 2007
Layers upon Layers
The latest pylon image. This is made from the layered image shown on the entry for October 13th. I started with this as the background layer in PSP then pasted as new layer and flipped, then pasted as new layer and mirrored. I used the selection tool set as a triangle to cut holes in layers 2 and 3 which sometimes overlap giving a complex arrangement of geometric shapes. This reminded me of seeing quilts where the colour combinations of triangles create the illusion of larger triangles overlapping.
More Playing with Pylons
I hadn't mentioned it on this blog but a couple of months ago, I experimented with making the pylon images into .gif animations. I layered two images of paper rubbings in Paint Shop Pro and then saved copies with the visibility of the layers adjusted so that the underneath layer gradually becomes visible. I then used this series as frames in Animation Shop and added smoothing transitions. A second animation was created by taking the black outline of part of a pylon as the staring image. Using PSP I made four images with the pylon repeated 1,2,3 and 4 times in layers. The second layer was a mirror image, the third flipped and the fourth mirrored and flipped. These were used again as animation frames with transitions added to take the image from white to the four layers. The results can be seen on my website.
When I showed these to Sian, she suggested I slowed them down and increased the size. I have done this today but as the files are very large, I have not uploaded them. I also changed animation 2 so that it goes from white to the complex image and then breaks down again returning to white.
Monday, June 04, 2007
Back to Work
Sunday, February 11, 2007
Module 1 Continues
Have spent a bit of time working on the pages of my research project and they look much more interesting. This week I finished a cover for them, made with string and crumpled tissue paper using the pylon design. I have given it a concertina spine so it can expand if more pages are added. It lacks a fastening at present - I think it needs some kind of tie.
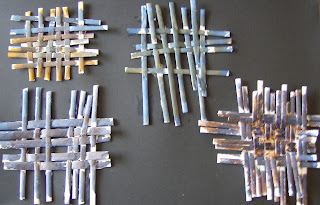
I have also started work on the chapter on fabric construction - shown are pictures of some weaving samples in paper.
Subscribe to:
Posts (Atom)