 |
| Photo 1 | |
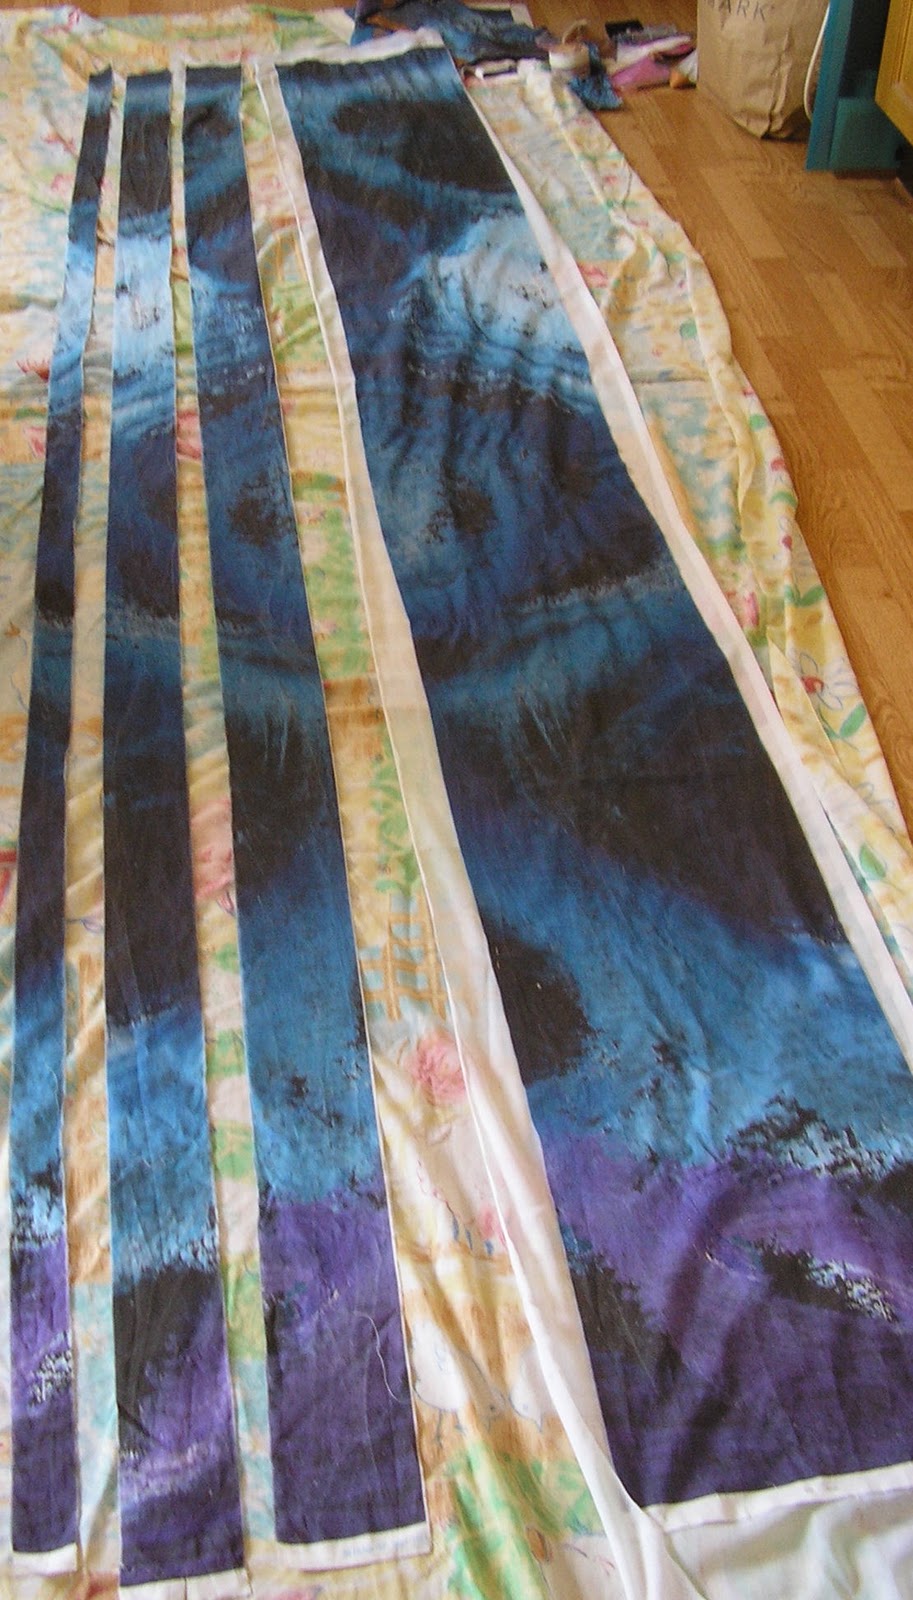
Back in February, I showed pictures of stitching on a small sample of my design that had been printed by Spoonflower. I was excited by this so I went ahead and ordered a full length, knowing it would take about 2 weeks to arrive. Because the design is narrow, it was repeated across the width of the fabric and I choose to mirror it so I have the original, a mirror image and about 2/3 of the width of another copy as it didn't quite fit 3 times. As the image is not an exact multiple of 1 yard, I also have a partial repeat of the top. Photo 1 shows the design at full size laid out on the floor. Meanwhile I had got some feedback from Sian who suggested I try to incorporate more texture and take advantage of the dimensional possibilities.
I spent some time (actually rather a lot) in total inaction because I liked the length of fabric just as it was, and I had to convince myself it would be okay to change it. I finally screwed up my courage and started cutting up the copies, reminding myself that nothing would be wasted as I can always use more patchwork cushions and the sofa is blue, so that's fine. I know I should probably play in paper and do drawings but it isn't the same.
As I was feeling stuck, I tried two different ideas simultaneously to see where they would take me. This post follows one and the next post will follow the other (just as soon as I retrieve my camera from being used for a school project by number 2 daughter). I have also revisited the planned site with the fabric and measured up and taken photos, so I can produce a room plan and show how it would look.
So - photo 2 mirror image cut into strips.
 |
| Photo 2 |
Photos 3 to 6 strips laid on top of original in different arrangements.
 |
Photo 3
|
 |
| Photo 4 |
 |
| Photo 5 |
 |
| Photo 6 |
Photo 7 - strips sewn together
 |
| Photo 7 |
Photo 8 - here I cut up the excess fabric into smaller rectangles and laid them on the main design, matching the colours and adding a couple of pieces of bronze painted fabric (see earlier post about adding bronze to represent astronomical instruments). For scale, there is a 10p coin in the bottom right corner (1" diameter). This and the following photos are 'sketches' which could be continued up to full size.
 |
| Photo 8 |
Photo 9 - similar to 8 but on a plain background.
 |
| Photo 9 |
Photo 10 - This time I arranged the bits in colour order from dark at the bottom to light at the top, completely breaking up the image, but I think keeping the sense of movement in the fragments. Could be seen as reaching up to the light. I would need to reintroduce the purple/lavender shades as this bit is just blues shading to charcoal.
 |
| Photo 10 |
Photo 11 - I finger-pleated some of the pieces in different directions to make the surface more interesting.
 |
| Photo 11 |


4 comments:
That fabric is so beautiful - I would never have had the courage to cut it up but I know you have done the right thing - it's looking good. The other design arrangements are great too - so many possibilities and so many decisions to be made.
Love your fabric and hey, you can always order another length of fabric from spoonflower!
I do like your experiments, and my absolute favorite is picture nr 8!
I hope to see you on my blog every now and again, I am trying to be more active :-)
All the best,
Tineke
I like no. 8 too - love the fabric - maybe you are going to need a bigger house!
Thanks for your encouragement ,I'm finding it hard on the fingers.I like number 4 and like the idea of your strips sewn together to raise the surface.
Post a Comment