The first picture shows how I joined the two pieces. The second was the challenge to find an interesting way of fringing the the top edge and turning it to make a tube for hanging. I pulled the loose ends through in bundles, twisted and tied in place with coloured threads.
Sunday, May 25, 2008
Drawn Threads
This is another slight diversion from coursework but all part of the journey. This pictures are from a workshop with Sian Martin at my local branch of Embroiderers' Guild. I hadn't planned to go and it filled up quickly, but there was a last minute cancellation. Sian gave a talk the evening before on fresh ways of looking at working with drawn thread, and we worked with both white and dyed linen. The only rule was that any threads withdrawn had to be put back in by the end of the day. The finished sampler (although I am not sure it is finished) is about 20cm wide and I think about 1m long.
The first picture shows how I joined the two pieces. The second was the challenge to find an interesting way of fringing the the top edge and turning it to make a tube for hanging. I pulled the loose ends through in bundles, twisted and tied in place with coloured threads.

The first picture shows how I joined the two pieces. The second was the challenge to find an interesting way of fringing the the top edge and turning it to make a tube for hanging. I pulled the loose ends through in bundles, twisted and tied in place with coloured threads.
Wednesday, April 30, 2008
More Module 2 samples

A short post to show a trial sample. I printed one of the displacement maps shown in my post of January 26th onto prepared cotton and machined over it. I free machined using a darning foot but no hoop and let it distort the fabric. Not entirely sure about the result, it may need something added to make a focal point.
Thursday, April 10, 2008
Taking a Break/ Poetry in Stitches
Sometimes it seems I go three steps forward and two steps back - as soon as I do a good run of coursework, it grinds to a halt and I lose the thread (sometimes literally - the heap in the corner of the kitchen is getting out of hand again. Perhaps I should rename the blog Losing the Thread). Decoupling the school holidays from Easter means that all the adults were on holiday two weeks ago so we had the usual family visits etc then but the children are on holiday now. So not a lot of coursework going on. But I have finally made something I have been meaning to do for the last three years.

My youngest daughter's favourite poem when she was 5 was "Reward and Punishment" by Roger McGough which lists things that will be given if you are very good or naughty - we would read it night after night. My favourite line is the promise of "a pocketful of yes's" - I think it is a lovely image and I imagined giving her a handful of IOUs with yes on every one to make up for all the times I have to say no. I saved her favourite jeans when she outgrew them, intending to do something to illustrate the line but was only spurred into action when I came across the Poetry in Stitches 2 project being organised by the National Needlework Archive.
The piece had to made to a set size, so I cut down the jeans and made a patchwork background using leftover fabric from I quilt I made her a couple of years ago - it was a bit touch and go as there was very little left but we got there. I wanted to make the picture very special for her so I was determined to use fabric with meaning to us.
Now, what can I do for the other daughter to make it fair?
My youngest daughter's favourite poem when she was 5 was "Reward and Punishment" by Roger McGough which lists things that will be given if you are very good or naughty - we would read it night after night. My favourite line is the promise of "a pocketful of yes's" - I think it is a lovely image and I imagined giving her a handful of IOUs with yes on every one to make up for all the times I have to say no. I saved her favourite jeans when she outgrew them, intending to do something to illustrate the line but was only spurred into action when I came across the Poetry in Stitches 2 project being organised by the National Needlework Archive.
The piece had to made to a set size, so I cut down the jeans and made a patchwork background using leftover fabric from I quilt I made her a couple of years ago - it was a bit touch and go as there was very little left but we got there. I wanted to make the picture very special for her so I was determined to use fabric with meaning to us.
Now, what can I do for the other daughter to make it fair?
Friday, March 14, 2008
More on Chapter 11
I found myself on the computer this afternoon with an odd half hour free so I had a little play with yesterday's photos on Paint Shop Pro. I had just been reading the article in the March edition of Workshop on the Web about making picture tubes so of course I had to try it out.


Here are two ideas using the same photo as a tube. The tube is created using file-export-picture tube and I used 9 cells so the picture is divided into 9 pieces. Using the picture tube tool and a random setting means that each time you click it produces one of these pieces (Hazel Credland's article explains this much more clearly). In the first one, I used two copies of the whole figure and then filled in with the tubes. For the second, just the tubes.

This final picture was a mistake - I was trying to use the panoramic option in Photo Album to produce a long picture of all the variations of this pin man by joining the photos in a row (it is meant for creating panoramic landscape shots from lots of overlapping photos). I forgot that as the photos are almost identical, it carefully matches them up so they end up on top of one another instead of side by side. But I quite like it.


Here are two ideas using the same photo as a tube. The tube is created using file-export-picture tube and I used 9 cells so the picture is divided into 9 pieces. Using the picture tube tool and a random setting means that each time you click it produces one of these pieces (Hazel Credland's article explains this much more clearly). In the first one, I used two copies of the whole figure and then filled in with the tubes. For the second, just the tubes.

This final picture was a mistake - I was trying to use the panoramic option in Photo Album to produce a long picture of all the variations of this pin man by joining the photos in a row (it is meant for creating panoramic landscape shots from lots of overlapping photos). I forgot that as the photos are almost identical, it carefully matches them up so they end up on top of one another instead of side by side. But I quite like it.
Thursday, March 13, 2008
Chapter 11
Playing with pin men - my figure was originally drawn at my daughter's gym class and was someone in mid jump. It has been scaled up and cut into pieces -the first set of photos show some of my arrangements of the pieces, testing how much can be removed before it no longer looks like a figure.
Below are some variations in coloured papers.
.

.


Friday, February 29, 2008
Module 2 Chapter 9
Finally reached a point where I can send off a batch of coursework - only a few months late. Chapter 8 was decorating/texturing papers using flour paste, keeping loosely to the theme of opus anglicanum. For chapter 9 I have translated some of these into stitch. Here is a selection.
Above - Coils of metal shim coloured with heat, loose threads held down with long stitches.
Below - couched coils of wire and metal threads over free machining.
Friday, February 22, 2008
If you Can't Beat Them...
The children seem to spend a lot of time on YouTube and have been having fun making animations of their Harry Potter lego, so I decided it was time to have a go. I have uploaded a short clip of the pylons animation which can be found here (I hope).
Tuesday, February 12, 2008
Weekend in London and More Animation
Last weekend was a bit of a treat - there were two exhibitions in London I really wanted to see so I stayed over and overdosed on art on Saturday. I needed a long walk on Wimbledon Common on Sunday to recover before coming home. The first was Prism at the Mall Galleries, a wonderfully varied collection. Some of my personal favourites were Joan Baillie's Mysterious Stones in atmospheric rusty oranges and browns and Rachel Gornall's calm and restrained Cenote series. I was intrigued by Lois Woodyer's hangings with photo transfers of Canary Wharf combined with stitch and Catherine Dormor's hangings with photographic images of the process of sewing. The gallery was crowded with groups of mainly women happily discussing the pieces and taking tea.
Next stop was the V&A where I went to see Out of the Ordinary:Spectacular Craft. Sian had already pointed me in the direction of Anne Wilson's work that includes animation so it was exciting to see Errant Behaviour running. Over two screens, threads, pins and lace fragments wind, form into heaps and move. Sometimes they seem like animals or undersea creatures, sometimes they form tableaux like jungle vegetation stirring. Interesting to think about how much the effect is suggested/affected by the sound track.
When I got home, I did some surfing, idly wondering if I could do stop motion animation with equipment I already have (last time I did some was probably 35 years ago when my big brother borrowed Dad's cine camera and we filmed toys moving across the floor). I came across a useful little utility for turning a folder of jpg files into an avi - i.e. stills into a movie - really easily. Eureka! This has overcome the problem of the files being too big too save - I have been able to save the frames individually and join up afterwards. Playing last night, I was able to increase the number of frames and adjust the number shown per second to make a much smoother film.
Next stop was the V&A where I went to see Out of the Ordinary:Spectacular Craft. Sian had already pointed me in the direction of Anne Wilson's work that includes animation so it was exciting to see Errant Behaviour running. Over two screens, threads, pins and lace fragments wind, form into heaps and move. Sometimes they seem like animals or undersea creatures, sometimes they form tableaux like jungle vegetation stirring. Interesting to think about how much the effect is suggested/affected by the sound track.
When I got home, I did some surfing, idly wondering if I could do stop motion animation with equipment I already have (last time I did some was probably 35 years ago when my big brother borrowed Dad's cine camera and we filmed toys moving across the floor). I came across a useful little utility for turning a folder of jpg files into an avi - i.e. stills into a movie - really easily. Eureka! This has overcome the problem of the files being too big too save - I have been able to save the frames individually and join up afterwards. Playing last night, I was able to increase the number of frames and adjust the number shown per second to make a much smoother film.
Monday, February 04, 2008
Module 2 Chapter 7
Tuesday, January 29, 2008
Exhibition News
Saturday, January 26, 2008
More Distractions

After posting the pictures of stitching with metal threads I couldn't resist having a little play with Paint Shop Pro. I thought it was time to explore displacement maps after reading Maggie Grey's blog, so here are the results. These have been made by combining two of the photos from the Jan 16th post.
This is the same as the first but using tiling.
This uses the same photos but layered the other way up.
My other distraction today was to go on a workshop with the Embroiderers's Guild run by Orange and Blue, painting sketchbook covers. We built up the surface using cardboard and then many layers of paint. The pictures show the cardboard glued down then with 6 or 7 layers of paint. It isn't finished yet - I want to sleep on it before adding more, then it will need lots of layers of varnish.


I booked it thinking it would be fun day (which it was) and without any clear idea of what design to use. Somehow, those pylon shapes crept in.
Tuesday, January 22, 2008
A bit of Reassurance
We had our Embroiderers' Guild committee meeting at my house last week and one of our members gave a powerpoint presentation. Why is this relevant? Because she had borrowed a digital projector so I was able to see how my animated piece looks at full size for the first time (although without the canvases as background). Cool - as my children would say.
Wednesday, January 16, 2008
Post Christmas Catch Up
I have been beavering away but somehow did not get as far as the computer. I have been researching opus anglicanum and making related samples. The first picture is underside couching worked on canvas. Like so many things it looks more interesting on the back but I forgot to photograph it so I will have to add later.

Here are some of the samples for module 2 chapter 6, playing with metallics inspired by ecclesiastical embroidery. These are done with goldwork threads plus a little bit of painted wire mesh. I am working on more with bits of drinks cans etc. These are all tiny as very slow to make.


Here are some of the samples for module 2 chapter 6, playing with metallics inspired by ecclesiastical embroidery. These are done with goldwork threads plus a little bit of painted wire mesh. I am working on more with bits of drinks cans etc. These are all tiny as very slow to make.
Wednesday, November 21, 2007
Trying Another Background
After seeing all my bits and pieces for the assessment piece, Sian gave me some more ideas for backgrounds, one of which was to try plain white panels set at angles. I like this idea - it can look interesting by itself while not being too busy when the projection is going. Here are some photos of my trials using artist's stretched box canvases - the mysterious dark shape at the right is a metre rule to show the scale. I haven't worried too much about placing the canvases other than trying to echo the lines/shapes that will appear - the arrangement would need to fit the space where it is being shown and the size of the projection may vary. I was hoping to get some strong shadows as well but may have to wait until the summer - it is cloudy and wet this week and we have had virtually no daylight in the house. The three pictures below show stages of the animation - the odd colour is because the canvases are bright white but the wall is slightly peachy. My husband has been very understanding about the blu-tac marks on the wall but I think he would draw the line at repainting it white just for a photo.
Picture quality isn't brilliant - it is a case of juggling focus on the projector and the camera and not getting in front of the light. It is quite interesting to see the slide projection close-up on the canvases as the greys split into different coloured pixels. One rainy Sunday, I should try copying the design in paints onto a spare canvas.
Tuesday, November 13, 2007
Animation Frames


In case it is not working, here are some stills from animation 1 on my website to get a flavour of it. The animation cycles through overlays of these images on a loop, so the second one gradually appears on top of the first and the first fades out. Then the third appears on top and the second fades out and so on ad infinitum. It is not as interesting as the black and white one but quite soothing.
Module 2 Chapter 3
Samples for contemporary laidwork - incorporating a shape. Three trials to interpret the design. Clockwise from top left - design on paper; machine stitching and strips of fabric over fabric shape; machine stitched shape overlaid with grid; threads wrapped over a frame held with hand stitches, shape created by stitching another grid on top. The second picture is a close up of this. The colour scheme refers back to work from module 1.


Monday, November 05, 2007
Sample for Background
A quick addition to the last post - a scaled down sample for a fabric background (20cm square). Top a scan of the sample, below it is overlaid with one of the frames from the animation printed onto a transparency.


Some further thoughts on using this piece in different ways 1) get individual frames professionally printed onto box canvases and hang as a series. 2) use individual frames as a basis for further digital development eg as a tube in Paint Shop Pro 3) play with simplified version with software for embroidery machine to produce repeatable motif.
Assessment Piece
Work continues on this piece (see September entries). I have finished the animation finally and need to sort out a background. Unlike the earlier drafts, I haven't published the animation on my website because the file is so large.
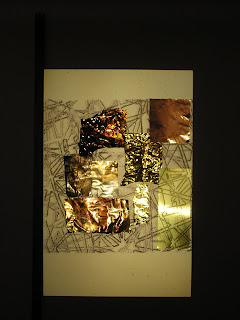
To clarify my ideas for the background, I have tried blu-tacking various things to the wall and projecting images onto them to get an idea of the effect. I have done this simply by printing small images onto OHP transparencies and using a slide projector so they are very grainy - the real thing would be better quality (I hope). In the photo below, the wooden stick on the left is a metre rule to give a sense of scale.
The first picture shows various pieces of fabric keeping the blue theme from earlier work - all but one are from my dyed samples so I could repeat roughly the same colours. If I used a fabric background, I would wrap toning threads around in straight lines to echo the paper samples. To see what I mean, see Animation 1 at my website.
An alternative idea is to use a metallic background so I tried sticking up a few different metal samples - eg puree tubes, shim, drinks cans coloured by heating (these are all bits I already had stashed away). From the picture below left you can see there is a problem with reflections and with some parts being too dark to show the image. The piece of metal at the bottom right of this picture with the clearest image is brass shim which has not been used and is smooth, but as it would be rather boring by itself at full size, I heated it over a picnic stove to add some colour - see picture below right.

.
To clarify my ideas for the background, I have tried blu-tacking various things to the wall and projecting images onto them to get an idea of the effect. I have done this simply by printing small images onto OHP transparencies and using a slide projector so they are very grainy - the real thing would be better quality (I hope). In the photo below, the wooden stick on the left is a metre rule to give a sense of scale.
The first picture shows various pieces of fabric keeping the blue theme from earlier work - all but one are from my dyed samples so I could repeat roughly the same colours. If I used a fabric background, I would wrap toning threads around in straight lines to echo the paper samples. To see what I mean, see Animation 1 at my website.
An alternative idea is to use a metallic background so I tried sticking up a few different metal samples - eg puree tubes, shim, drinks cans coloured by heating (these are all bits I already had stashed away). From the picture below left you can see there is a problem with reflections and with some parts being too dark to show the image. The piece of metal at the bottom right of this picture with the clearest image is brass shim which has not been used and is smooth, but as it would be rather boring by itself at full size, I heated it over a picnic stove to add some colour - see picture below right.
There are of course other options - I like the idea of using something old and rusty but so far haven't found anything suitable. It needs to be a bit over 1m square and portable enough to wall mount for exhibiting (or maybe lean against a wall). It would also need to be fairly light coloured to show the black lines clearly - all suggestions gratefully received!
Perhaps I could create a project by taking a projector out and about to different locations and filming the results - for example by running the animation against some storage containers or warehouse walls or a gasometer. Now all I need is a fairy godmother with a data projector (is there such a thing as a battery model?) and a camcorder.
.
Friday, November 02, 2007
Four little samples loosely based on laidwork. Clockwise from top left 1) scraps of fabric held in place by a grid of long stitches and cross stitches 2) torn fabric strips laid on soluble fabric, threads couched down with lines of machine stitching. Dissolved and applied to background with rows of running stitch 3) dyed pelmet vilene, wireform held down with long stitches, couched stuffed cotton ribbon, on top a grid of long stitches held down with small stitches at the intersections 4) close lines of long stitches, lines of tailor tacking held in place with cross stitch.
Module 2 Chapter 2 Continues

This is the second batch of designs based on laidwork. All of these were made using artist's masking fluid and I wanted to do these to have a more consistent colour scheme from which to work samples. Unfortunately, in some places the masking fluid stuck fast and wouldn't shift without tearing the paper even though I used the same paper as before.
Subscribe to:
Posts (Atom)
